Basic Functions
|
|
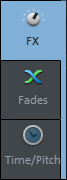
On the left there are buttons to switch between the three different views of the Object editor:
|
Note: By right-clicking in a free area, you can select different color schemes (skins) for the object editor display. The skins with the name suffix "Editor Max" display all three views together in one window.
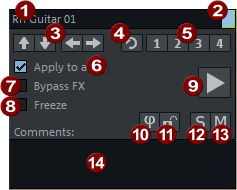
The right section is the same in all three views:
|
|
This text field displays the object name, which can also be edited here. |
|
|
By clicking on the square next to it you can set the background color of the object. |
|
|
Use the arrow buttons to move between objects on the tracks. They are not available when multiple objects are selected. Keyboard shortcut: < / > or Ctrl + Alt + Q / Ctrl + Alt + W |
|
|
Reset: Resets the selected object to the original (neutral) setting. |
|
|
1-4: Snapshots for object editor settings. These snapshots can be used on all objects in the project, so you can use them to transfer effect settings from one object to one (or more) other objects. Click one of the buttons to save. To load the snapshot, click this button again. To overwrite a saved snapshot, click the button while holding down the Shift key. The active snapshot is marked by a bullet point. In the context menu of the snapshots you can load and save snapshots and also delete them. There, the object settings can also be saved to a file or loaded from a file in order to use them across projects. The file names of the saved object settings are listed in the lower section of the menu. In the load options you can define which settings should be loaded from the snapshots. |
|
|
Apply to all: If you activate the "Apply to all" option, all selected objects will be updated when the object editor is open. All modified settings after the selection will be applied to all other selected objects. In the menu under the small arrow Example: You have changed the level in an object from -7dB to -3dB, i.e. increased it by 4dB. If you transfer the volume to another object with volume -2dB relatively, it will have -2dB + 4dB = +2dB afterwards. If you transfer the volume absolutely, it will also have -3dB afterwards. The Plug-ins option initially refers only to the fact that a specific plug-in is loaded into an object. The actual parameter settings of a plug-in are transferred only when the plug-in's interface is opened and closed. This can lead to a situation where you have adjusted a plug-in on one object and then accidentally open the same plug-in on another object, overwriting the settings. For this reason, there is an option in the menu Transfer plug-in changes (open dialogs) now to explicitly update the same plug-in in all other objects without closing the plug-in dialog. Transfer all plug-ins now transfers the parameters of all plug-ins to all selected objects. |
|
|
Bypass FX: This deactivates all object effects, EQ/panorama settings, and AUX sends. |
|
|
Freeze: Switches object freeze on and off. |
|
|
Play/Stop: This button corresponds to the normal playback function, except when Solo is active in the object editor (see below). |
|
|
Phi: The Phi button causes a 180 degree phase rotation. By right-clicking on the Phi button you can invert the left or right channel individually. |
|
|
Lock: Lock Object. |
|
|
Solo: When playing with the play button in the object editor (keyboard shortcut: spacebar with focus on object editor), playback starts from the beginning of the selected object and mutes all other objects. |
|
|
Mute: This button mutes the selected object. By right-clicking you can also mute the left and right channels individually. |
|
|
Comments: You can enter comments relevant to the selected object in this field. |


 you can specify which settings are to be transferred. There are two different options for the volume,


